This post demonstrates a reasonably simple way to automatically deploy and run code builds for your sites using webhooks and GitHub (you can use GitLab or whatever your preference is). We will create a webhook that is fired when we push updates to our origin repository and then use an incoming webhook server to listen for these and to fetch our updates then run our build scripts.
Installing our Incoming Webhook Server
We'll be using the following incoming webhook server to acheive our goal - https://github.com/adnanh/webhook
This webhook server is written in Go and is really simply to get set up. It is easy to configure as the config file is just JSON.
I'll be spinning up a fresh droplet with DigitalOcean for this example but you can use your own existing server and websites.
We could use this process to test in a staging environment but for this post we'll just be keeping it simple.
I'll be running all commands in this post as a user johndoe with sudo permissions.
If you intend to run any npm commands in your build script make sure you have nodejs installed on your server.
The first thing we need to do is install golang on our server so that we can then install the incoming webhook server. You can do so using the following commands, make sure to find the latest stable version from the list here - https://golang.org/dl/
e.g. go1.10.3.linux-amd64.tar.gz
cd ~
wget https://dl.google.com/go/go<VERSION>.<OS>-<ARCH>.tar.gz
sudo tar -C /usr/local -xzf go<VERSION>.<OS>-<ARCH>.tar.gz
export PATH=$PATH:/usr/local/go/bin
Then we can simply install the latest version of webhook with the following command:
go get github.com/adnanh/webhookThis will create a file ~/go/bin/webhook, in my case /home/johndoe/go/bin/webhook.
Configuring our Webhooks
Create a folder called ~/hooks and then create a folder inside hooks with the same name as the website your going to deploy. In my case I'll just call it my-site-1. This is where we'll put our deploy.sh script and also an output.log file.
mkdir ~/hooks
mkdir ~/hooks/my-site-1
Now create a new file inside the hooks directory and add following inside JSON inside, make sure to change my-site-1 to the name of your site and also change the command-working-directory to the correct root directory of your site:
nano ~/hooks/hooks.json[
{
"id": "deploy-my-site-1",
"execute-command": "/home/johndoe/hooks/my-site-1/deploy.sh",
"command-working-directory": "/var/www/my-site-1/",
"response-message": "Executing deploy script...",
"trigger-rule":
{
"and":
[
{
"match":
{
"type": "payload-hash-sha1",
"secret": "<RANDOM-SECRET-STRING>",
"parameter":
{
"source": "header",
"name": "X-Hub-Signature"
}
}
},
{
"match":
{
"type": "value",
"value": "refs/heads/master",
"parameter":
{
"source": "payload",
"name": "ref"
}
}
}
]
}
}
]Replace
Inside the ~/hooks/my-site-1 folder create an output.log file. Then create a file named deploy.sh.
cd ~/hooks/my-site-1
touch output.log
touch deploy.sh
chmod +x deploy.sh
The chmod command simply makes the .sh file executable.
Add the following inside deploy.sh (update to suit your sites needs):
#!/usr/bin/env bash
# redirect stdout/stderr to a file
exec > /home/johndoe/hooks/my-site-1/output.log 2>&1

git fetch --all

git checkout --force "origin/master"

npm install --production

npm run production

composer install --no-dev

php artisan route:cache

php artisan config:cache

php artisan view:cache

php artisan queue:restart
The third line of the above simply redirects all output to our output.log file. Then we run git fetch and get checkout to get our code updates from our origin repo (in my case GitHub).
You can update the other commands to suit your needs. Since I'm using a Laravel app as an example I'll run some artisan commands to clear the cache and restart the queue etc.
The incoming webhook server runs on port 9000 by default you can change this if you wish as described here but for our example we'll just leave it.
You now need to make sure that port 9000 is open on your server, which may involve updating your firewall rules. If you're using a service such as RunCloud (affiliate link) this is very easily done from the user interface.
Once you've made sure port 9000 is open we can try running the server to see if everything is working so far.
Starting up our Webhook Server
To start the server enter the following command making sure to change johndoe to your user's username and
/home/johndoe/go/bin/webhook -hooks /home/johndoe/hooks/hooks.json -ip "<YOUR-SERVER-IP>" -verboseIf you now visit http://<YOUR-SERVER-IP>:9000/hooks/deploy-my-site-1 in the browser you should see a message saying Hook rules were not satisfied. This is because the rules we specified in hooks.json including the secret string were not included in our request and therefore not satisfied.
Stop the webhook server by typing CTRL+C in the terminal.
Go to your sites web root on your server and initialise a git repository, then add your remote GitHub url.
cd /var/www/my-site-1
git init
git remote add origin git@my-site-1:willbrowningme/my-site-1.git
The reason we use the above as the remote origin url is so that we can use an alias in our ~/.ssh/config file to specify which ssh key to use when connecting. Update my-site-1 to the name of your repo. If you are using GitLab or another service that allows multiples repos per key then you can have the above as git@github.com:willbrowningme/my-site-1.git.
In ~/.ssh/ create a new file called config and add the following inside:
If the .ssh directory doesn't exist yet then simply create it by running mkdir ~/.ssh.
nano ~/.ssh/config# My Site 1 Repo
Host my-site-1 github.com
HostName github.com
IdentityFile ~/.ssh/my_site_1_id_rsaMake sure to change my-site-1 to the alias you definied above for the remote branch and also the IdentityFile to the path for the private key we are about to generate.
If we try to now run git fetch -all we will get an error saying Permission denied (publickey). This is because we haven't yet set up a deploy key for the repo in GitHub.
Generating our Deploy Key
To fix this let's generate a new ssh key paid on our server by running. Substitute the email for your GitHub email.
When it asks Enter a file in which to save the key name it like so - /home/johndoe/.ssh/my_site_1_id_rsa and leave the passphrase blank. (replace my_site_1 with the name of your github repo)
ssh-keygen -t rsa -b 4096 -C "your@github-email.com"Again, the reason we are doing this is because GitHub only allows one deploy key to be used for each repository. You cannot use the same key for multiple repositories. Hence the naming convention.
I beleive GitLab does allow you to use it for multiple repos so you can just leave the name as default id_rsa in that case if you wish.
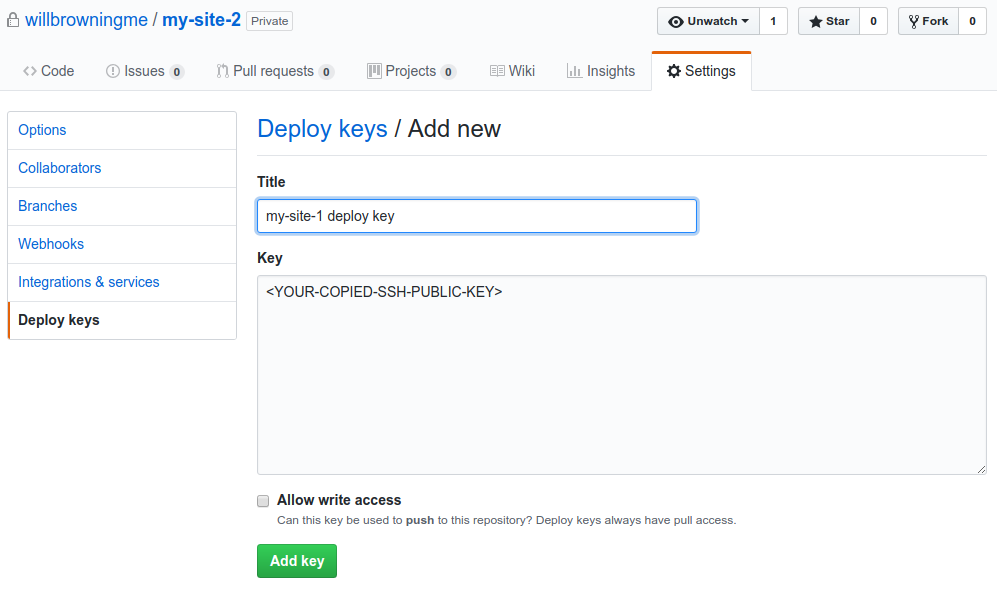
Now we need to copy the public key and add it to GitHub as a deploy key. So open up the pub key file.
vi ~/.ssh/my_site_1_id_rsa.pubCopy the contents of this file and then type :q to quit the vim editor.
On GitHub go to the repo in question click on settings and then Deploy Keys. Click "add deploy key" and paste in the contents of your public key we just generated.
Now back in your websites web root and try to run the following again.
cd /var/www/my-site-1
git fetch --all
git checkout --force "origin/master"With any luck the commands should work correctly now.
In the GitHub repo go to settings then webhooks and click "add a webhook". For the payload url enter http://<YOUR-SERVER-IP>:9000/hooks/deploy-my-site-1 replacing your server IP and the ID you gave in hooks.json for the webhook.
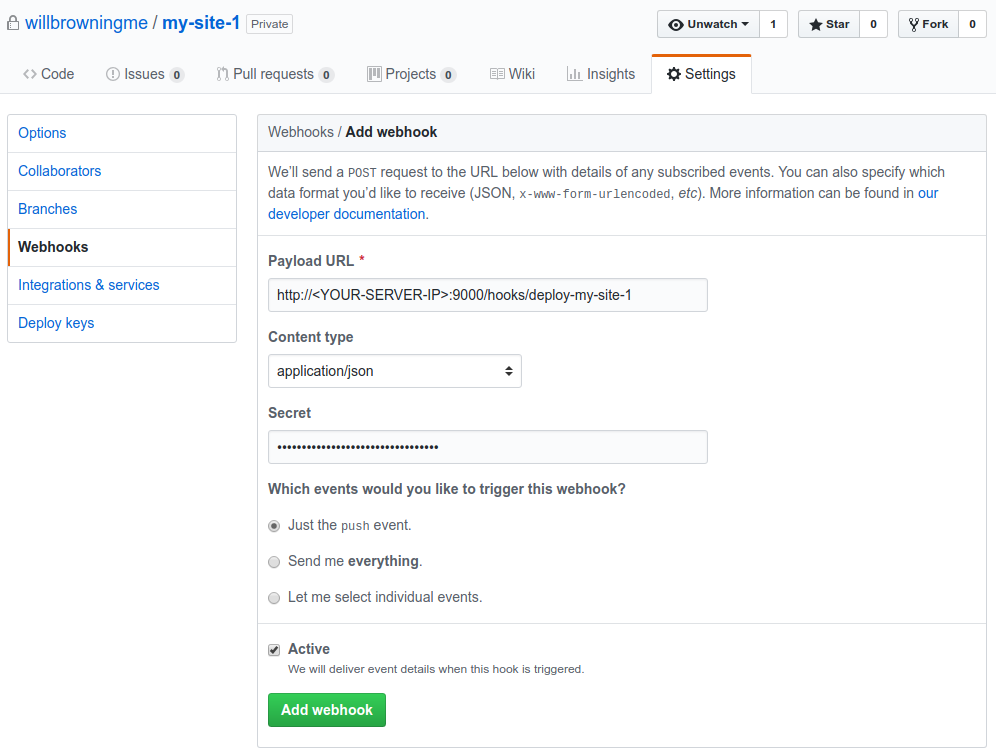
Choose application/json for the content type and make sure to enter the random secret string you generated ealier in our hooks.json file. These will need to match or the script will not be exectuted. Choose "just the push event" and save the webhook.
Testing it Works
Now we need to test it all works as planned. So start up your webhook server again by running:
/home/johndoe/go/bin/webhook -hooks /home/johndoe/hooks/hooks.json -ip "<YOUR-SERVER-IP>" -verboseMake an edit or an update to your code on your local pc repository so that we can commit the changes and then push them to GitHub by running:
git push origin masterThis should now trigger GitHub to send the webhook delivery to our server which will then run the deploy.sh script for my-site-1 and will fetch the updates we just made and then build the site with the commands we gave.
If you visit GitHub settings and then webhooks you should see the new delivery under Recent Deliveries. Make sure it has a 200 response code and shows the response body we gave of "Executing deploy script...".
Stop the webhook server by typing CTRL+C into the terminal.
Installing Supervisor to Keep our Webhook Server Running
Now that everything is working as planned let's install supervisor so we can keep the webhook server running in the background.
So below we install supervisor then create a new .conf file inside the /etc/supervisor/conf.d directory.
sudo apt install supervisor
cd /etc/supervisor/conf.d
sudo nano webhooks.confAdd the following inside the webhooks.conf file, replacing the username and IP etc. with your values.
[program:webhooks]
command=bash -c "/home/johndoe/go/bin/webhook -hooks /home/johndoe/hooks/hooks.json -ip '<YOUR-SERVER-IP>' -verbose"
redirect_stderr=true
autostart=true
autorestart=true
user=johndoe
numprocs=1
process_name=%(program_name)s_%(process_num)s
stdout_logfile=/home/johndoe/hooks/supervisor.log
environment=HOME="/home/johndoe",USER="johndoe"Save this file and then run.
touch ~/hooks/supervisor.log
sudo supervisorctl reread
sudo supervisorctl update
sudo supervisorctl start webhooks:*I had a lot of issues with the webhooks.conf file and getting supervisor to start the server as the non root user. Initially it kept running the server as root which would then cause all the npm and git commands inside deploy.sh to fail.
However I managed to get it working correctly by setting the right environment variables and then running the command through bash -c "the-command-here".
So now we should have the webhooks server running nicely in the background ready to receive incoming deliveries from GitHub.
Make another edit to your local code and push it to GitHub to make sure everything is still working as it should.
Check the output.log file at ~/hooks/my-site-1/output.log to see the output from deploy.sh.
Adding Another Site
If you want to add another site with a different set of deploy and build commands you can follow these steps:
First let's edit hooks.json so that it looks something like this:
[
{
"id": "deploy-my-site-1",
"execute-command": "/home/johndoe/hooks/my-site-1/deploy.sh",
"command-working-directory": "/var/www/my-site-1/",
"response-message": "Executing deploy script...",
"trigger-rule":
{
"and":
[
{
"match":
{
"type": "payload-hash-sha1",
"secret": "<RANDOM-SECRET-STRING>",
"parameter":
{
"source": "header",
"name": "X-Hub-Signature"
}
}
},
{
"match":
{
"type": "value",
"value": "refs/heads/master",
"parameter":
{
"source": "payload",
"name": "ref"
}
}
}
]
}
},
{
"id": "deploy-my-site-2",
"execute-command": "/home/johndoe/hooks/my-site-2/deploy.sh",
"command-working-directory": "/var/www/my-site-2/",
"response-message": "Executing deploy script...",
"trigger-rule":
{
"and":
[
{
"match":
{
"type": "payload-hash-sha1",
"secret": "<RANDOM-SECRET-STRING>",
"parameter":
{
"source": "header",
"name": "X-Hub-Signature"
}
}
},
{
"match":
{
"type": "value",
"value": "refs/heads/master",
"parameter":
{
"source": "payload",
"name": "ref"
}
}
}
]
}
}
]We then need to add a new folder called my-site-2 and then a new file called deploy.sh, making sure to change the output file too.
mkdir ~/hooks/my-site-2
touch ~/hooks/my-site-2/output.log
nano ~/hooks/my-site-2/deploy.shInside our new deploy.sh file add the following:
#!/usr/bin/env bash
# redirect stdout/stderr to a file
exec > /home/johndoe/hooks/my-site-2/output.log 2>&1
git fetch --all
git checkout --force "origin/master"
npm install --production
npm run production
composer install --no-dev
php artisan route:cache
php artisan config:cache
php artisan view:cache
php artisan queue:restartRemember to make it executable too.
chmod +x ~/hooks/my-site-2/deploy.shThen we need to generate a new key pair named my_site_2_id_rsa and add the public key to the deploy key section in the github repo just like we did earlier.
So initialise a new git repo (if you haven't got one already) and add the corresponding remote origin url to your code in /var/www/my-site-2 (or wherever you site is located).
cd /var/www/my-site-2
git init
git remote add origin git@my-site-2:willbrowningme/my-site-2.gitThen update ~/.ssh/config
# My Site 1 Repo
Host my-site-1 github.com
HostName github.com
IdentityFile ~/.ssh/my_site_1_id_rsa
# My Site 2 Repo
Host my-site-2 github.com
HostName github.com
IdentityFile ~/.ssh/my_site_2_id_rsaTest using git fetch
git fetch --all
git checkout --force "origin/master"
If all went well the git fetch command should have worked.
Next make sure to restart the supervisor job as we have updated the hooks file.
sudo supervisorctl reloadNow make an edit on your local repo of the your second project and test pushing the changes to origin.
Success! You should now be set up with automatic deployments and builds for the sites.
If you can see a way to improve on this setup then please let me know in the comments.