In this post we'll be setting up our category page to display all posts that have a tag matching our category. We'll also be setting up our dynamic routes so that when we run "npm run generate" all the individual post and category routes will be correctly generated.
If you haven't read Part 1 of this guide you can find it here - Part 1: Setup
Generating our dynamic routes for individual blog posts
You might be wondering how can we generate static pages for each blog post when deploying or updating our site?
Nuxt comes with an easy solution for this, so open up your nuxt.config.js and add the following above the build: {...} property:
generate: {
  routes: async () => {
    let { data } = await axios.post(process.env.POSTS_URL,
    JSON.stringify({
        filter: { published: true },
        sort: {_created:-1},
        populate: 1
      }),
    {
      headers: { 'Content-Type': 'application/json' }
    })
    return data.entries.map((post) => {
      return {
        route: post.title_slug,
        payload: post
      }
    })
  }
},
So what's going on here? Well first we make a call to our Cockpit backend to get our post entries. We then map this response into an object containing the actual route (we're using the title slug for this) and also a payload object.
The payload we set to the entire post entry. This will be passed to each generated blog post and we'll be able to access it and display the contents.
This makes generating our static site faster as we won't need to fetch each blog post individually from every blog post page we generate.
You can read more about this at Nuxtjs.org.
So now we've told our blog what routes it needs to have we need to create a page that will display the contents of individual blog posts.
The convention for dynamic pages in Nuxt is to name the page like so _title_slug.vue where title_slug is the unique route identifier in our case. Notice also we have prefixed title_slug with an underscore.
So create a new file called _title_slug.vue in the pages directory. If you want your links to be /blog/title_slug instead of just /title_slug then you need to create a blog directory in the pages directory then put _title_slug.vue in there. You can of course use /post/title_slug or whatever you like.
Inside the newly created _title_slug.vue file add this code:
<template>
  <section>
    <article class="my-8">
      <div class="text-gray-600 font-bold text-sm tracking-wide">
        <a v-for="(tag, key) in post.tags" :key="key" :href="'/category/'+tag" class="ml-1">{{ tag }}</a>
      </div>
      <h1 class="mt-2 text-3xl font-bold">
        {{ post.title }}
      </h1>
      <div class="mt-4 markdown" v-html="post.excerpt + '\n' + post.content">
      </div>
    </article>
  </section>
</template>
<script>
export default {
async asyncData ({ app, params, error, payload }) {
if (payload) {
return { post: payload }
} else {
let { data } = await app.$axios.post(process.env.POSTS_URL,
JSON.stringify({
filter: { published: true, title_slug: params.title_slug },
sort: {_created:-1},
populate: 1
}),
{
headers: { 'Content-Type': 'application/json' }
})
if (!data.entries[0]) {
return error({ message: '404 Page not found', statusCode: 404 })
}
return { post: data.entries[0] }
}
}
}
</script>So as you can see we accept the payload as an argument in the asyncData method. We then check if we have the payload available (which is the post for that particular page in our case). If we do then we simply return it as post to the page data (you can check in Vue dev-tools).
If we don't have a payload i.e. when running our dev server then we simply send a post request to Cockpit. Notice the filter object in the request body that asks for the post with the same title_slug as the requested page. We can then check if this post exists in the response, if it does we return it and if not return the 404 error page.
Fire up the dev server again with npm run dev. You should have something that looks like this.
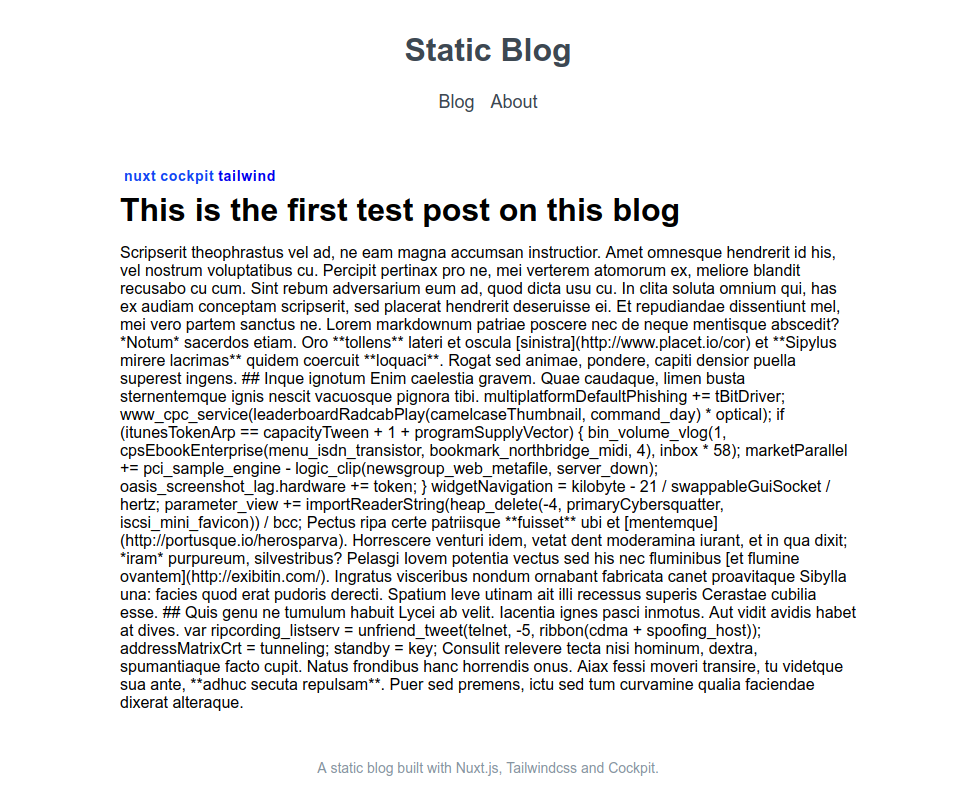
Now you may have noticed our markdown is not being parsed and it looks really messy. Don't worry we'll fix this soon!
Note: If you're looking for some markdown placeholder text you can use Lorum Markdown to generate some.
Parsing our Markdown
Let's sort out our markdown parsing and code higlighting.
npm install marked highlight.js --save-devWe'll make a global filter that we can use to parse our Markdown so create a file called filters.js in the plugins directory and put this in it:
import Vue from 'vue'
import highlightjs from 'highlight.js'
import marked, { Renderer } from 'marked'

// Only import the languages that you need to keep our js bundle small
highlightjs.registerLanguage('php', require('highlight.js/lib/languages/php'))
highlightjs.registerLanguage('javascript', require('highlight.js/lib/languages/javascript'))
highlightjs.registerLanguage('css', require('highlight.js/lib/languages/css'))

// Create your custom renderer.
const renderer = new Renderer()
renderer.code = (code, language) => {
  // Check whether the given language is valid for highlight.js.
  const validLang = !!(language && highlightjs.getLanguage(language))
  // Highlight only if the language is valid.
  const highlighted = validLang ? highlightjs.highlight(language, code).value : code
  // Render the highlighted code with `hljs` class.
  return `<pre><code class="hljs ${language}">${highlighted}</code></pre>`
}

// Set the renderer to marked.
marked.setOptions({ renderer })

Vue.filter('parseMd', function(content) {
    return marked(content)
})
Make sure you also add the following to nuxt.config.js underneath the head:{...} property
plugins: [
  '~/plugins/filters.js'
],
We can now use this filter globally!
Back in _title_slug.vue in the template where it says v-html we can now access our filter by putting:
v-html="$options.filters.parseMd(post.excerpt + '\n' + post.content)"I know this isn't the prettiest solution but unfortunately we can't just pipe filters using '|' like we would usually - {{ some-markdown | parseMd }} as it isn't possible in v-html.
You can create a method to call instead if you would like to tidy it up.
Back in nuxt.config.js update the css: property to include a theme for highlight.js - full list here.
 css: [
  '@/assets/css/main.css',
  'highlight.js/styles/dracula.css'
],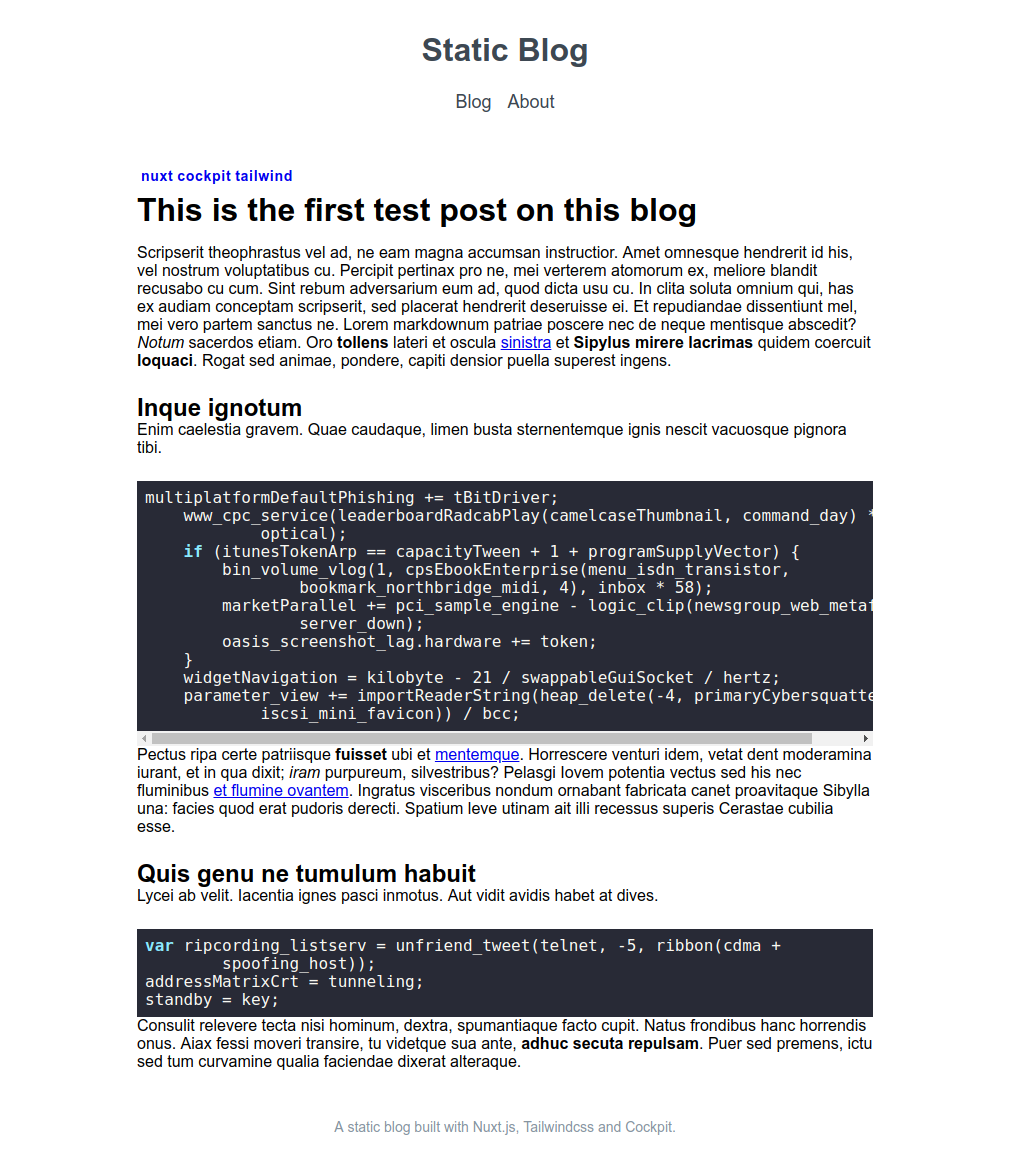
That's starting to look a bit more like it!
Generating our Category Routes
Okay, so we've got our individual blog posts and their routes but we now want to generate routes for the different post categories based on their tags.
For example if we have a post tagged vue we want to be able to click on this tag to see all other posts that have been tagged vue.
So lets go back to nuxt.config.js and update our routes method in the generate: property.
Just before we do let's add a package that lets us work with collections so we can easily get the data we need from our Cockpit response.
npm install collect.js --save-devMake sure to add const collect = require('collect.js') at the top of our nuxt.config.js too.
Update the generate property in nuxt.config.js so that is resembles the below.
generate: {
  routes: async () => {
    let { data } = await axios.post(process.env.POSTS_URL,
    JSON.stringify({
        filter: { published: true },
        sort: {_created:-1},
        populate: 1
      }),
    {
      headers: { 'Content-Type': 'application/json' }
    })

    const collection = collect(data.entries)

    let tags = collection.map(post => post.tags)
    .flatten()
    .unique()
    .map(tag => {
      let payload = collection.filter(item => {
        return collect(item.tags).contains(tag)
      }).all()

      return {
        route: `category/${tag}`,
        payload: payload
      }
    }).all()

    let posts = collection.map(post => {
      return {
        route: post.title_slug,
        payload: post
      }
    }).all()

    return posts.concat(tags)
  }
},
So here we use the same data returned from Cockpit as previously. Only this time we first collect the post entries into a const called collection.
For our tags we first map the collection into a new collection of just the post tags. Then we flatten this and call unique() on it to give us a collection of unique tags. (We would normally run flatMap() instead of calling map() and then flatten() however it wouldn't work as expected for me with collect.js)
With this unique collection of tags we map them into the route and payload properties like we did previously. For the tag payload we simply filter the original collection and return only post entries that have the specified tag.
For the posts we can simply map them directly into their route and payloads.
Finally we just call posts.concat(tags) to join the two together and return this.
So now we've got routes for our posts and a category page for each unique post tag!
Creating our Category page
Since we've set our category routes to be /category/tag-name we need to create a category directory inside the pages directory.
Inside the category directory create a new file called _tag.vue (following the same naming convention as before) and put the following inside:
<template>
  <section>
    <div class=my-8>
      <h1 class="mb-6">Posts tagged with "{{ category }}"</h1>
      <ul class="flex flex-col w-full p-0">
        <li class="mb-6 w-full" v-for="(post, key) in posts" :key="key">
          <div class="text-gray-600 font-bold text-sm tracking-wide">
            <a v-for="(tag, key) in post.tags" :key="key" :href="'/category/'+tag" class="ml-1">{{ tag }}</a>
          </div>

          <a :href="'/'+post.title_slug">
            <h2 class="my-2 text-gray-800 text-lg lg:text-xl font-bold">
              {{ post.title }}
            </h2>
          </a>

          <div class="page-content hidden md:block text-base mb-2" v-html="post.excerpt">
          </div>
          <a class="text-sm text-blue-400" :href="'/'+post.title_slug">
            Read more
          </a>
        </li>
      </ul>
    </div>
  </section>
</template>
<script>
export default {
async asyncData ({ app, params, error, payload }) {
if (payload) {
return { posts: payload, category: params.tag }
} else {
let { data } = await app.$axios.post(process.env.POSTS_URL,
JSON.stringify({
filter: { published: true, tags: { $has:params.tag } },
sort: {_created:-1},
populate: 1
}),
{
headers: { 'Content-Type': 'application/json' }
})
if (!data.entries[0]) {
return error({ message: '404 Page not found', statusCode: 404 })
}
return { posts: data.entries, category: params.tag }
}
}
}
</script>This page is largely similar to our index.vue page in terms of the template. Notice that we again accept the payload from our nuxt.config.js if it's available.
If we don't have a payload then we make a post request to Cockpit and include in the filter tags: { $has:params.tag } this returns all posts that have a tag for that particular category.
We can't call params.tag directly in our template which is why we simply pass it to our data object as category.
In the next part we'll look at how to go about deploying our site and also adding some finishing touches.
You can find Part 3 here - Part 3: Deployment and see a live demo of the site on Netlify here - https://nuxt-cockpit-static-blog.netlify.com