In this post we'll be looking at adding a comment system for our blog posts in Cockpit. The system will allow comments on our blog posts, nested replies, comment moderation, basic spam protection and even markdown support!
If you haven't read Parts 1, 2, 3, 4, 5 and 6 of this guide you can find them here:
- Part 1: Setup
- Part 2: Dynamic Routes
- Part 3: Deployment
- Part 4: Post Pagination
- Part 5: Searching Posts
- Part 6: Contact Forms
Comment sections on static sites
There are a number of different ways you can go about adding comments to your static site. The most common option is usually by using a third party service and embedding the comments onto your page using an iframe. Some examples are:
There are also some pretty awesome self-hosted options like Commento (the commenting platform I'm using for this site).
A Cockpit Comment System
We're going to take advantage of Cockpit forms and use that as a basis for setting up comments on our blog.
Here's how it will work:
- Someone will fill out the comment form on our blog
- This comment will be saved as a form entry in a form called comments
- We will receive an email giving us the option to approve or view/delete the comment
- If approved then our static site will be rebuilt to reflect the change and display the new comment
There's quite a lot more going on than that but it should give a basic overview.
Starting With Cockpit on the Backend
To get started we'll head over to Cockpit and create a new form called comments.
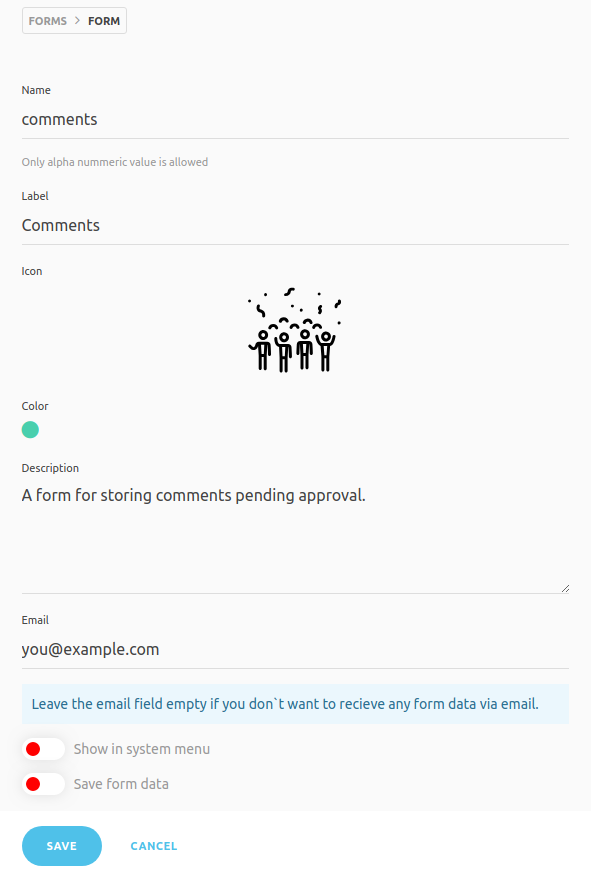
Make sure you leave save form data as false, I'll explain why shortly.
You also need to set up SMTP mailer settings in your config if you have not done already. I explain how in my previous post on contact forms.
You should already have an API key you can use only for form submissions if you followed the last post in this series, if not create a new key and add this in the rules section /api/forms/submit/*.
Give it a test by sending a post request with Insomnia or Postman to see if your token is working as expected.
You should receive a notification email but you won't see a new form entry saved as we set this to false above.
This new comments form is where new comments will be posted to and saved when they are awaiting approval.
Once approved we will be deleting the entry from here, but more on that later.
Creating a New Comments Collection
When we approve a comment we are going to save it as a new collection entry and remove its entry from the comments form.
This will allow us to create a collectionLink (relationship) between our post and the comments for that post.
That way when we fetch our posts data from Cockpit we can also fetch the comments belonging to each post at the same time.
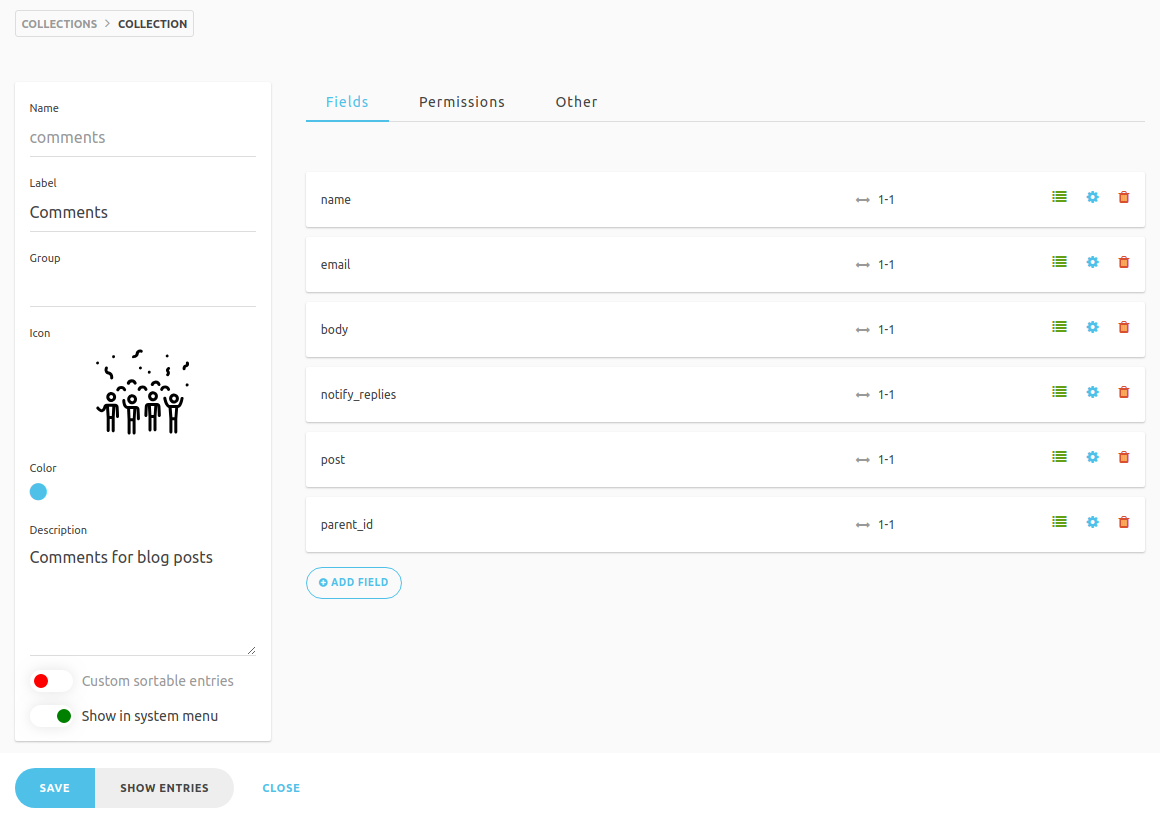
So head over to Collections in Cockpit and click Add Collection.
Our new comments collection will have the following fields:
- name (type text)
- email (type text)
- body (type markdown)
- notify_replies (type boolean) (options
{"default": false}) - post (type collectionlink) - (options
{"link": "posts", "display": "title", "multiple": false, "limit": false}) - parent_id (type text)
Make sure to include the options in the provided JSON options field when adding the notify_replies and post fields.
We set multiple to false in the post collectionLink, we've essentially created the inverse of a one to many relationship. (In Laravel this would be like return $this->belongsTo('App\Post');)
Updating Our Posts Collection
If you've been following along with this series you should already have a posts collection set up. If not I show you how in my first post of the series here.
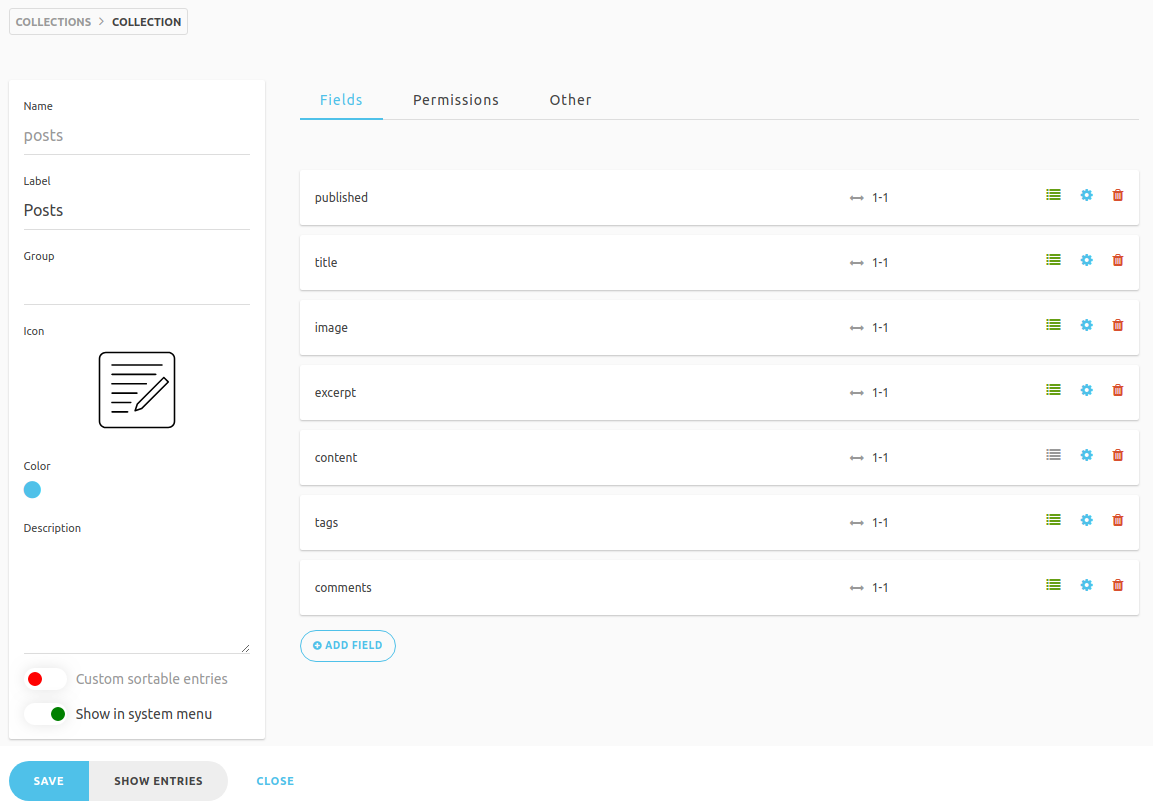
We need to add a new collectionLink field called comments with the following options:
{
  "link": "comments",
  "display": "name",
  "multiple": true,
  "limit": false
}
Notice here that we've set multiple to true, this is essentially a one to many relationship. E.g. One post can have many comments. (In Laravel this would be like return $this->hasMany('App\Comment');)
Your posts collection should now look something like this:
Okay so we've created a new comments form, a comments collection and updated our posts collection. Next we need to look at how we go about approving new comments that arrive in our comments form.
Approving The New Comment With a Custom Endpoint
When a new comment is made we need to be able to moderate it first before it is published to the site, that's why we keep all pending comments in our comments form first.
We're going to create a new custom endpoint in Cockpit that will allow us to simply click a link and approve a comment.
We first need to add a new custom API key that only has permission to approve comments. So head over to settings, API Access and add a new key with the following in the rules section /api/forms/approve/comments. We don't want to share this key with anyone.
To add a new custom api endpoint create a new file at config/api/forms/approve/ called comments.php (you'll need to create the directories api, forms and approve) this will allow us to visit https://cms.yourdomain.com/api/forms/approve/comments?id=xxxx&token=xxxx to access it.
We'll be passing an id parameter of the comments form entry to the endpoint which is why I've included it in the url above.
In this file add the following:
<?php
// find the form entry using its id we included in the url
$form_entry = cockpit('forms')->findOne('comments', ['_id' => $this->param('id', null)]);

if (!$form_data = $form_entry['data']) {
    return $this->stop('{"error": "No form entry found"}', 412);
}

// find the post that this comment is for
$post = cockpit('collections')->findOne('posts', ['_id' => $form_data['post_id']]);

if (!$post) {
    return $this->stop('{"error": "No post found"}', 412);
}

// create a new comment in the comments collection with the form data and create collectionLink to the post
$comment_data = [
    'parent_id' => $form_data['parent_id'],
    'name' => $form_data['name'],
    'email' => $form_data['email'],
    'body' => $form_data['comment'],
    'notify_replies' => $form_data['notify_replies'],
    'post' => [
        '_id' => $post['_id'],
        'link' => 'posts',
        'display' => $post['title']
    ]
];

$comment = cockpit('collections')->save('comments', $comment_data);

// check if this is the first comment on the post, if so then $post['comments'] will be an empty string so we update it to an empty array to prevent the next line throwing an error
if(!is_array($post['comments'])){
    $post['comments'] = [];
}

// also add a collectionLink from the post to the new comment
$post['comments'][] = [
    '_id' => $comment['_id'],
    'link' => 'comments',
    'display' => $comment['name']
];

$post = cockpit('collections')->save('posts', $post);

// delete the form entry from the comments form
cockpit('forms')->remove('comments', ['_id' => $form_entry['_id']]);

// redirect to view the comments collection
$this->reroute($this->baseUrl('/collections/entries/comments'));
I've tried to add comments to the above code to explain what's going but what we basically do is first find the entry in the comments form by its id (we included it in the url id=xxx).
Then find the post that this pending comment belongs to. Then we save the new comment in the comments collection and create a collectionLink to the post.
We then update the post so that it also has a collectionLink to the new comment.
Finally we remove the form entry and redirect to the comments collection page.
Saving The Form Entry
We're going to need to access our approve comment form API key in the next file we create. To avoid hard coding it and potentially accidently committing it to version control we will create a .env file in our Cockpit root directory. Inside this .env file enter:
APPROVE_TOKEN=xxxxxx
SITE_URL=https://cms.yourdomain.com
Making sure to replace xxxx with your actual "approve comment" api key from above and SITE_URL with the url of your Cockpit site (no trailing slash).
Next create a new file in your Cockpit directory at config/bootstrap.php. Put the following inside:
<?php
// save the form entry and add its _id to data
$app->on("forms.submit.before", function($form, &$data, $frm, &$options) use ($app) {

    if($form === 'comments'){

        // make sure the comment has a valid post_id that exists
        if(isset($data['post_id']) && $post = cockpit('collections')->findOne('posts', ['_id' => $data['post_id']])){

            $data['post_title'] = $post['title'];

            $entry = cockpit('forms')->save($form, ['data' => $data]);

            $data['id'] = $entry['_id'];

        } else {
            $app->stop('{"error": "No post found"}', 412);
        }
    }

});
This is an event that we hook into before the form is submitted. We first make sure it is the correct form (in our case called comments) then we make sure that the form data we receive has the post_id set and that an actual post with that ID exists in our database.
If it does then we add post_title to the data and then save the submission as a new entry. That is why when we created the comments form above we made sure to set save form data as false, otherwise it would save the entry twice.
You might be wondering why I'm saving the form entry now when it could have been saved anyway if we had just set save form data to true. The answer to that is because we need the _id of this entry so we can pass it through to our notification email and use it in our approve endpoint.
So after we save the entry we can retrieve its _id and add $data['id'] to our data so we can use it in our email template along with our SITE_URL and APPROVE_TOKEN from our .env file.
Creating a Custom Email Notification Template
In Cockpit you can create custom email templates to override the default one. To do this you simply create a new file at config/forms/emails/ with the same name as the form you wish to override.
In our case we need to create one called comments.php, once created add the following:
@if( isset($data['post_title']) )
A new comment is awaiting approval on <b>{{ $data['post_title'] }}</b>
<br><br>
@endif

@if( isset($data['name']) )
<b>Name:</b>
<br>
<br>{{ htmlspecialchars($data['name'], ENT_QUOTES, 'UTF-8', true) }}
<br>
@endif

@if( isset($data['email']) )
<br><b>Email:</b>
<br>
<br>{{ htmlspecialchars($data['email'], ENT_QUOTES, 'UTF-8', true) }}
<br>
@endif

@if( isset($data['comment']) )
<br><b>Comment:</b>
<br>
<br>{{ htmlspecialchars($data['comment'], ENT_QUOTES, 'UTF-8', true) }}
<br>
@endif

@if( isset($data['id']) )
<br>
<a href="{{ getenv('SITE_URL') }}/api/forms/approve/comments?id={{ $data['id'] }}&token={{ getenv('APPROVE_TOKEN') }}">Click here to approve this comment</a>
<br><br>
or
<br>
@endif

<br>
<a href="{{ getenv('SITE_URL') }}/forms/entries/comments">View and delete it</a>
All we are doing here is using the data to create an email that will tell us who made the comment, the comment itself and allow us to click a link to approve the comment.
It is important to make sure you include htmlspecialchars($var, ENT_QUOTES, 'UTF-8', true) to protect ourselves against a comment containing malicious scripts etc.
Testing The Template and Approval
Now if you send a post request to submit the comments form with the correct data making sure you replace the post_id with the ID of one of your blog posts otherwise you won't be able to approve it.
{
    "form": {
        "post_id": "xxxxxxxx",
        "parent_id": null,
        "name": "John Doe",
        "email": "you@example.com",
        "comment": "This is my new comment.",
        "notify_replies": true
    }
}
Also make sure you use one of your real email addresses for email with notify replies set as true as we will be replying to this comment later.
You can find the ID of one of your blog posts by making a GET request to /api/collections/get/posts?token=xxxx where xxxx is your posts collection API key. Choose a post and then copy the _id value.
You should receive an email notification that uses the custom template above and includes our approve url.
You can click on the approve url and if successful it should redirect you to the comments collection where you can see the newly created comment.
You'll notice that the comment has the name of the blog post in the post column. This is because we set the value display as title in the JSON options for the collectionLink.
If you view your posts collection entries you'll see that the comments column has a 1 in it.
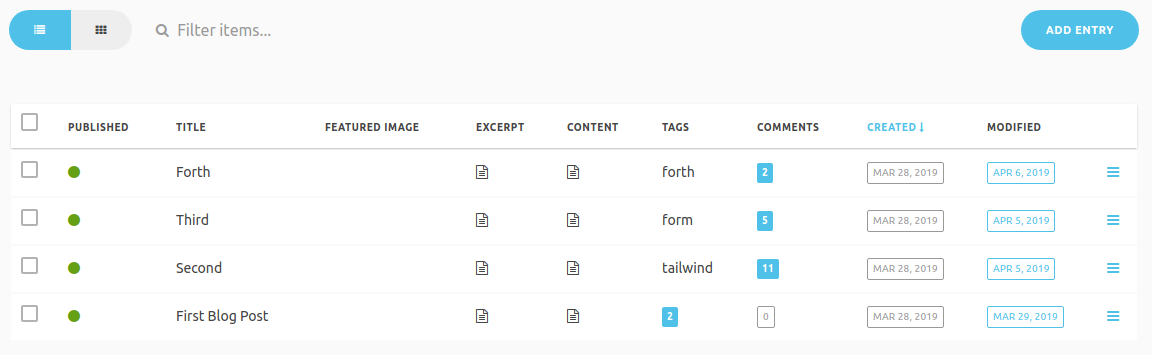
So that means our post and comment are linked succesfully!
To see this in action you can make a POST request to /api/collections/get/posts?token=xxx with the body set as:
{"sort":{"_created":-1},"populate":1}The populate option is important as it tells Cockpit to return and populate relationships 1 level deep. You should see in the response that each post has a "comments": [] array. If you find the blog post you added the comment to you should see the comment there.
If you set populate to -1 it will populate to infinite levels, however it can cause some issues and errors.
Try setting populate to 0 or removing it and you'll notice that you won't get all fields returned for your comment.
Creating a New Custom Email Template For Comment Replies
Okay so we can now add a comment using our form and then approve the comment but how about comment replies and notifying the parent comment?
Well first off we need to create a new custom email template, so in config/forms/emails create a new file called notify_reply.php and add the following inside:
@if( isset($data['post_title']) )
Your comment has a new reply on <b>{{ $data['post_title'] }}</b>
<br><br>
@endif

@if( isset($data['name']) )
<b>Name:</b>
<br>
<br>{{ htmlspecialchars($data['name'], ENT_QUOTES, 'UTF-8', true) }}
<br>
@endif

@if( isset($data['comment']) )
<br><b>Comment:</b>
<br>
<br>{{ htmlspecialchars($data['comment'], ENT_QUOTES, 'UTF-8', true) }}
<br>
@endif

@if( $data['post_url'] )
<br>
<a href="{{ $data['post_url'] }}">Click here to view the comment</a>
@endif
Again be sure to include htmlspecialchars() here! We'll pass all this data through to this template when we actually come to send the email.
Notifying The Parent Comment of New Replies
Now let's add the actual code that will send an email to the parent comment when it receives a reply and that reply is approved.
Just before we do open up your .env file and add the following:
FRONTEND_URL=https://yourdomain.comNote that there is no trailing slash. We'll be using this to create the url for the blog post with its title_slug e.g. https://yourdomain.com/first-blog-post.
Open up config/api/forms/approve/comments.php and update the following just after we remove the form entry:
// check if the comment has a valid parent comment and that it exists
if(isset($comment['parent_id']) && $parent_comment = cockpit('collections')->findOne('comments', ['_id' => $comment['parent_id']])){

    // check if the parent comment has notify_replies set to true
    if($parent_comment['notify_replies']){

        // validate the email for the parent comment
        if($this->helper('utils')->isEmail($parent_comment['email'])){

            // use our custom email template for a new reply notification
            if ($template = $this->path("#config:forms/emails/notify_reply.php")) {

                $notify_data = [
                    'post_title' => $post['title'],
                    'name' => $comment['name'],
                    'comment' => $comment['body'],
                    'post_url' => getenv('FRONTEND_URL').'/'.$post['title_slug']
                ];

                $body = $this->renderer->file($template, ['data' => $notify_data], false);

                // send email to notify parent comment of a new reply
                try {
                    $response = $this->mailer->mail($parent_comment['email'], "New comment reply on: {$post['title']}", $body);
                } catch (\Exception $e) {
                    $response = $e->getMessage();
                }
            }
        }
    }
}

// display error if present or redirect to view the comments collection
return (isset($response) && $response !== true) ? ['error' => $response] : $this->reroute($this->baseUrl('/collections/entries/comments'));
So what we're doing here is first checking to see if the comment has a parent_id value set, if it does and we find a comment with that ID in our database then check to see if the parent comment had notify_replies set to true.
If it does then we check if the parent comment's email is valid and if we have a custom template available called notify_reply.php (we do as we just created it).
Then we pass the data through to the template and attempt to send the email using our mailer.
Testing The Comment Reply Notification
If you used one of your real email addresses and set notify_replies to true when testing the comment approval above then we can now try and reply to this comment.
So first we need to find out the ID for the comment we would like to reply to, to do this you can make a GET request like above to your posts collection endpoint and find the post with the comment, then copy the ID for the comment.
Now we can make another form submission with the following data:
{
    "form": {
        "post_id": "xxxxxxxx",
        "parent_id": "xxxxxx",
        "name": "Jane Doe",
        "email": "you@example.com",
        "comment": "This is a reply to my first comment.",
        "notify_replies": true
    }
}
Making sure to use the same post_id as before and the parent_id as the ID we just copied from the first comment.
You should receive the email notification to confirm or view/delete the comment entry. Once you click approve you should then receive an email to the parent comment's email address letting you know your comment has a new reply.
Server Side Validation
Let's finish up the backend by adding some server side validation for our comments form.
If you've read the previous post about contact forms you'll know how to do this. Create a new file at config/forms/ called comments.php (it must have the same name as the one we gave our form).
<?php

// honeypot field
if (isset($data['website'])) {

    // you can save the submission in case it is actually a genuine one like we did in the last blog post on contact forms, make sure you have a form set up called bots
    cockpit('forms')->save('bots', ['data' => $data]);

    return false;
}

if (empty($data['post_id'])) {
    return false;
}

if (empty($data['name'])) {
    $this->app->stop(['error' => 'The name field is required'], 200);
}

if (!filter_var($data['email'], FILTER_VALIDATE_EMAIL)) {
    $this->app->stop(['error' => 'A valid email is required'], 200);
}

if (empty($data['comment'])) {
    $this->app->stop(['error' => 'The comment field is required'], 200);
}

if (!is_bool($data['notify_replies'])) {
    $this->app->stop(['error' => 'Notify replies must be of type boolean'], 200);
}

return true;
So we simply validate our comment form fields, we're going to use website as a honeypot field to catch bots like we did in the previous post. If the spam bot accidentally automatically fills in the website field we will return false.
So I think we've finished up setting the Cockpit side of the comment system up, let's now look at the Nuxt frontend.
Updating Our Nuxt .env and Config
Moving on to Nuxt.js and our frontend let's first update our Nuxt .env file and add our FORMS_TOKEN. If you've followed the previous post you should already have this.
Next open up nuxt.config.js and in the env property add:
env: {
  commentUrl: `${process.env.BASE_URL}/api/forms/submit/comments?token=${process.env.FORMS_TOKEN}`
},
This is the endpoint we'll be posting our comments to.
So make sure not to include any sensitive API keys here. We obviously need the form endpoint and token to be public otherwise we won't be able to submit new comments from the frontend.
Updating The Blog Post Page
Open up your _title_slug.vue page (the individual blog page) and update it to resemble the following:
<template>
<section>
<article class="my-8">
<div class="text-gray-600 font-bold text-sm tracking-wide">
{{ post._created | toDate }}
<a v-for="(tag, key) in post.tags" :key="key" :href="'/category/'+tag" class="ml-1">{{ tag }}</a>
</div>
<h1 class="mt-2">
{{ post.title }}
</h1>
<div class="mt-4 markdown" v-html="$options.filters.parseMd(post.excerpt + '\n' + post.content)">
</div>
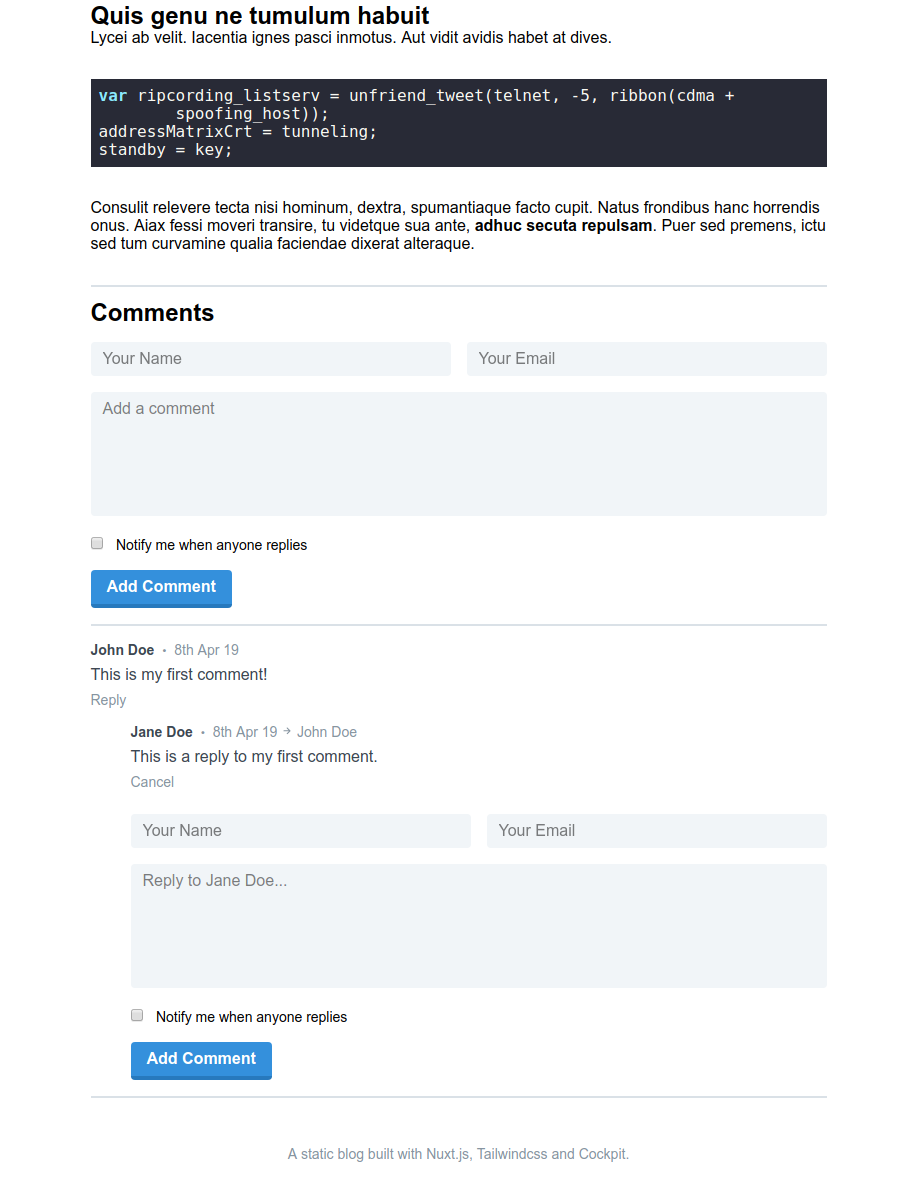
<div id="comments" class="mt-8 mb-4 pt-3 border-t-2">
<h2 class="mb-2">
Comments
</h2>
<comment-form class="border-b-2" :post_id="post._id"/>
</div>
<ul>
<comment
v-for="comment in comments"
:key="comment._id"
:post_id="post._id"
:all="post.comments"
:comment="comment"
/>
</ul>
</article>
</section>
</template><script>
import CommentForm from '~/components/CommentForm.vue'
import Comment from '~/components/Comment.vue'
export default {
async asyncData ({ app, params, error, payload }) {
if (payload) {
return { post: payload }
} else {
let { data } = await app.$axios.post(process.env.POSTS_URL,
JSON.stringify({
filter: { published: true, title_slug: params.title_slug },
sort: {_created:-1},
populate: 1
}),
{
headers: { 'Content-Type': 'application/json' }
})
if (!data.entries) {
return error({ message: '404 Page not found', statusCode: 404 })
}
return { post: data.entries[0] }
}
},
components: {
CommentForm,
Comment
},
head () {
return {
title: this.post.title,
meta: [
{ hid: 'description', name: 'description', content: this.post.excerpt },
]
}
},
computed: {
comments: function () {
return this.post.comments ? this.post.comments.filter(comment => !comment.parent_id) : []
}
}
}
</script>There are a few things to note here. We've got a CommentForm and a Comment component that we are yet to make. We pass the comment-form the current post ID as a prop. We loop over each comment and pass the comment component the post ID, all the comments for the post and the comment itself.
In the script section we register the Comment and CommentForm components.
We then have a computed property comments this simply returns all comments for our post that do not have a parent_id set e.g. they are top level comments.
At first I had comments set up with a collectionLink relationship to themselves so comments could have children and a parent. However I ran into issues whilst fetching the data relating to populate in the request and the depth it should be carried out to. For example if setting populate: -1 in the request it would cause timeout errors for me.
So I decided instead to keep it simple and just add a parent_id to any child comment that references the ID of its parent.
That way I can organise the comments correctly in Nuxt by filtering only the parent comments and then recursively finding their children if they have any.
The Comment Form Component
In your components directory create a new file called CommentForm.vue and add the following inside:
<template>
  <form @submit="checkForm" method="post" :id="parent_id ? `reply-${parent_id}` : ''">
    <div class="flex flex-col md:flex-row mb-4">
    <div class="w-full md:w-1/2 md:mr-2">
      <input v-model="name" type="text" name="name" placeholder="Your Name" class="block bg-gray-200 mt-2 rounded w-full py-2 px-3">
    </div>
    <div class="w-full md:w-1/2 md:ml-2">
      <input v-model="email" type="email" name="email" placeholder="Your Email" class="block bg-gray-200 mt-2 rounded w-full py-2 px-3">
    </div>
    </div>
    <div class="mb-4">
      <textarea v-model="comment" name="comment" rows="6" :placeholder="parent_id ? `Reply to ${parent_name}...` : 'Add a comment'" class="bg-gray-200 rounded resize-none w-full h-20 py-2 px-3">
      </textarea>
    </div>
    <div class="mb-4">
      <input v-model="notify_replies" class="mr-2" type="checkbox">
      <span class="text-sm">
        Notify me when anyone replies
      </span>
    </div>
    <input type="text" name="website" v-model="website" class="hidden opacity-0 z-0" tabindex="-1" autocomplete="off">
    <div class="mb-4">
      <input type="submit" value="Add Comment" :class="{ 'cursor-not-allowed opacity-50': loading }" class="cursor-pointer bg-blue-500 hover:bg-blue-400 text-white font-bold py-2 px-4 border-b-4 border-blue-600 hover:border-blue-500 rounded">
    </div>
    <div v-if="errors.length" class="mb-4 text-red-500">
      <b>Please correct the following error(s):</b>
      <ul>
        <li v-for="error in errors" :key="error">
          {{ error }}
        </li>
      </ul>
    </div>
    <div v-if="success" class="text-green-500 mb-4">
      <b>Your comment is currently awaiting moderation</b>
    </div>
  </form>
</template>
<script>
import axios from 'axios'
export default {
name: "commentForm",
props: {
post_id: String,
parent_id: String,
parent_name: String
},
data: function () {
return {
errors: [],
name: null,
email: null,
comment: null,
notify_replies: false,
website: null,
loading: false,
success: false
}
},
methods: {
checkForm: function (e) {
this.errors = []
this.success = false
if (!this.name) {
this.errors.push("Name required")
}
if (!this.email) {
this.errors.push('Email required')
} else if (!this.validEmail(this.email)) {
this.errors.push('Valid email required')
}
if (!this.comment) {
this.errors.push("Comment required")
}
if (!this.errors.length) {
this.submitForm()
}
e.preventDefault()
},
submitForm: function () {
this.loading = true
axios.post(process.env.commentUrl,
JSON.stringify({
form: {
post_id: this.post_id,
parent_id: this.parent_id,
name: this.name,
email: this.email,
comment: this.comment,
notify_replies: this.notify_replies,
website: this.website //honeypot field
}
}),
{
headers: { 'Content-Type': 'application/json' }
})
.then(({ data }) => {
this.loading = false
if(data.error){
this.errors.push(data.error)
} else if(data.name && data.email && data.comment) {
this.name = this.email = this.comment = null
this.success = true
}
}).catch(error => {
this.loading = false
this.errors.push('An error occured, please try again later')
})
},
validEmail: function (email) {
let re = /^(([^<>()\[\]\\.,;:\s@"]+(\.[^<>()\[\]\\.,;:\s@"]+)*)|(".+"))@((\[[0-9]{1,3}\.[0-9]{1,3}\.[0-9]{1,3}\.[0-9]{1,3}\])|(([a-zA-Z\-0-9]+\.)+[a-zA-Z]{2,}))$/
return re.test(email)
}
}
}
</script>The first thing to note is that this form is very similar to the contact form we did in the previous post.
If the component has a parent_id prop passed to it then we add an id to the form, you'll see why later. We also check for parent_id whilst setting the placeholder for the comment textarea, if there is a parent we reference the parent's name.
We need to import axios here as we're now calling it on the client side so can't use app.$axios as when in the asyncData function.
The form has some simple client side validation like our comment form and also the same honeypot field called website.
If the form submission has any errors we display them and if it's successful we display a success message.
The Recursive Comment Component
Now onto the Comment component, create a new file in the components directory called Comment.vue and add the following:
<template>
  <li class="mb-4" :class="!parent ? 'border-b-2' : ''">
    <div ref="parent">
      <div class="text-gray-600 text-sm mb-2">
        <span class="text-gray-800 font-semibold">
          {{comment.name}}
        </span>
        <span class="mx-1 text-xs">•</span>
        {{ comment._created | toDate }}
        <span v-if="parent">
          <svg xmlns="http://www.w3.org/2000/svg" viewBox="-5 -5 24 24" width="12" height="12" preserveAspectRatio="xMinYMin" class="inline-block text-gray-600 fill-current">
            <path d="M10.586 5.657l-3.95-3.95A1 1 0 0 1 8.05.293l5.657 5.657a.997.997 0 0 1 0 1.414L8.05 13.021a1 1 0 1 1-1.414-1.414l3.95-3.95H1a1 1 0 1 1 0-2h9.586z"></path>
          </svg>
          {{ parent.name }}
        </span>
      </div>

      <div class="comment text-gray-800 text-base" v-html="$options.filters.parseMd(comment.body)"></div>

      <div class="text-gray-600 text-sm mt-2 mb-4 cursor-pointer" @click="toggleReply">
        <span v-if="replyOpen">Cancel</span>
        <span v-else>Reply</span>
      </div>
    </div>

    <ul class="ml-10 comment-list" v-if="children(comment._id).length">
      <comment
      v-for="child in children(comment._id)"
      :key="child._id"
      :post_id="post_id"
      :all="all"
      :comment="child"
      :parent="comment"
      />
    </ul>
  </li>
</template>
<script>
import Vue from 'vue'
import CommentForm from '~/components/CommentForm.vue'
export default {
name: "comment",
props: {
post_id: String,
all: Array,
comment: Object,
parent: Object
},
data: function () {
return {
replyOpen: false
}
},
methods: {
children: function (parent_id) {
return this.all.filter(comment => comment.parent_id === parent_id)
},
toggleReply: function () {
if(!this.replyOpen){
let ComponentClass = Vue.extend(CommentForm)
let instance = new ComponentClass({
propsData: {
post_id: this.post_id,
parent_id: this.comment._id,
parent_name: this.comment.name
}
})
instance.$mount()
this.$refs.parent.appendChild(instance.$el)
this.replyOpen = true
} else {
// remove the reply form from the DOM
let form = document.getElementById(`reply-${this.comment._id}`)
if(form){
this.$refs.parent.removeChild(form)
this.replyOpen = false
}
}
}
}
}
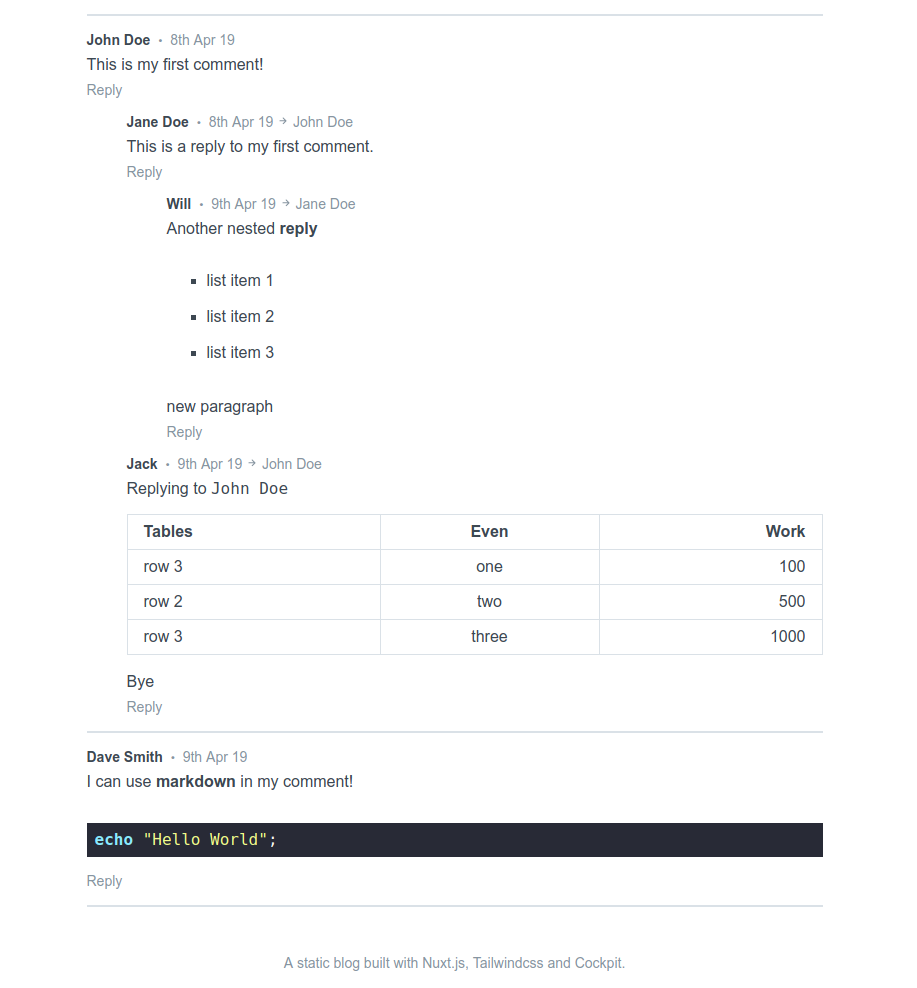
</script>This component is a little more complex than the CommentForm one. At the top in the li tag we check if the comment has a parent. If it doesn't then we add a border to the bottom, just to add some separation between top level comments.
We then display the comment author's name, the date it was made (approved in our case) and the body of the comment.
We will be sanitizing the comment body shortly as it is not safe to use v-html on unsanitized user inputted data. A malicious actor could easily include javascript code on our site.
If earlier in this post when you set up the comments collection you chose not to support markdown and set the comment body field type as a textarea then you do not need to pass the comment.body through v-html or $options.filters.parseMd().
We then have a div with Reply or Cancel depending on whether someone has clicked and opended a new comment form for that particular comment.
Finally we have a section for any child comments, hence this being a recursive component. We include the component again inside itself if the current comment has any children.
We loop over the comment's children and pass through the necessary props, again passing down the all posts variable, the post_id and the parent comment.
The method we have called children simply filters the all comments prop and returns any comments that have the current comment's ID set as their parent_id.
Now for the intersting part, handling comment replies. I needed a way to make sure the parent_id value was passed to the comment form if we were replying to a comment, that way we can identify which comment the reply belongs to.
You may have noticed that we imported Vue and CommentForm, this is so we can use them in the toggleReply method. In this method we first check to see if the replyOpen variable is set to false (e.g. the reply form is not active).
We then use Vue.extend to create a "subclass" of the base Vue constructor, passing in our CommentForm component. Next we create a new instance of this class and pass it the relevant props, including the parent_id which is the ID of the current comment. Then we mount this without passing through any mount point.
The reason we do not pass any mount point is because we want to insert it into the DOM ourselves. The Vue docs state that:
If elementOrSelector argument is not provided, the template will be rendered as an off-document element, and you will have to use native DOM API to insert it into the document yourself.
So now we can insert this template by calling this.$refs.parent.appendChild(instance.$el) where parent is a reference we added to a div at the top of the comment component like so ref="parent".
Now when we click on Reply the toggleReply function will be called and it will append a new instance of our CommentForm component to the end of this div.
If replyOpen is set to true then Cancel will be displayed instead of Reply and we will run the else portion of toggleReply. Here we simply find the comment form by id reply-${this.comment._id} and call again the parent reference using it to remove the comment form from the DOM and set replyOpen back to false.
Sanitizing The Markdown
As I mentioned above you cannot simply pass user inputted data through v-html as it will be rendered as actual html on the page. So if a user made a comment with this content:
<script>alert('Hello');</script>And we approved it, then whenever anybody visited the blog post with that comment on they would get an alert popup! You can read more about XSS attacks here.
To prevent against this we could either not run any user input through v-html (but then our markdown support wouldn't work) or first sanitize the data before displaying it on the page.
I tried a few different html sanitzers and in the end settled on Sanitize HTML.
Open up the terminal in your Nuxt root and run:
npm install sanitize-html --save-devNow that we've got it installed we need to use it, so open your filters.js file inside the plugins directory. Add the following to the top of the file:
const sanitizeHtml = require('sanitize-html')and then update the parseMd filter:
Vue.filter('parseMd', function(content) {
  let clean = sanitizeHtml(content)

  return marked(clean)
})
So all we're doing here is first passing through the content to sanitizeHtml and then passing the cleaned content to marked to parse the markdown.
If you want to test your sanitization is working as it should be try posting a comment with the content from this xss-payload-list.
SanitzeHtml seems to cope with this XSS payload well and mitigates all attempted attacks.
Adding a Little Styling
Let's add a tiny bit of css for our comments, so update your main.css to the following:
@tailwind base;

@tailwind components;

a {
  @apply text-blue-400;
}

.content {
  width: 50rem;
}

.markdown p {
  @apply mt-0 mb-6;
}

.markdown ul {
  @apply mb-6;
}

.markdown pre {
  @apply my-8;
}

.comment {
  @apply whitespace-pre-wrap;
}

.comment p {
  @apply mb-4 inline-block;
}

.comment p:last-of-type {
  @apply mb-0;
}

.comment pre {
  @apply my-4;
}

.comment pre:last-of-type {
  @apply mb-0;
}

.comment p:last-child {
  @apply mb-0;
}

/* purgecss start ignore */
table {
  @apply overflow-auto w-full;
}

table tr {
  @apply bg-white border-t border-gray-400;
}

table th, table td {
  @apply border border-gray-400 py-2 px-4;
}

.search-results em {
  @apply not-italic bg-blue-200;
}
/* purgecss end ignore */

@tailwind utilities;
The whitespace-pre-wrap will help make sure the comments display correctly on the page.
Adding Hooks in Cockpit For When Deleting Comments or a Post
With our collectionLink between a post and its comments if you delete a comment we would like the deleted comment to be "unlinked" from the post.
This doesn't seem to happen by default so we need to add a collections.remove.before.comments hook to do it for us.
So in config/bootstrap.php add the following code:
$app->on("collections.remove.before.comments", function($name, &$criteria) use ($app) {

    // find the comment using its id
    $comment = cockpit('collections')->findOne('comments', ['_id' => $criteria['_id']]);

    if(isset($comment['post']['_id'])){

        // find the post it is currently linked to
        $post = cockpit('collections')->findOne('posts', ['_id' => $comment['post']['_id']]);

        if(isset($post['comments']) && is_array($post['comments'])){

            $comment_ids = array_column($post['comments'], '_id');

            $key = array_search($comment['_id'], $comment_ids);

            unset($post['comments'][$key]);

            cockpit('collections')->save('posts', $post);
        }
    }
});
All we are doing here is finding the comment we're about to delete, then finding the post it belongs to and removing the link by unsetting the corresponding array item in the $post['comments'] array.
Now we can also do the reverse, e.g. unlink all comments (or just delete them if we want) for a post when the post is deleted.
So add the following below the above:
$app->on("collections.remove.before.posts", function($name, &$criteria) use ($app) {

    // find the post using its id
    $post = cockpit('collections')->findOne('posts', ['_id' => $criteria['_id']]);

    if(isset($post['comments']) && is_array($post['comments'])){

        // loop over each linked comment
        foreach($post['comments'] as $item){

            $comment = cockpit('collections')->findOne('comments', ['_id' => $item['_id']]);

            // set the post to an empty string
            $comment['post'] = "";

            cockpit('collections')->save('comments', $comment);
        }
    }
});
Now this will simply unlink the comments but not delete them, if you'd like to just delete them update the loop to this:
// loop over each linked comment
foreach($post['comments'] as $item){
// delete each linked comment
cockpit('collections')->remove('comments', ['_id' => $item['_id']]);
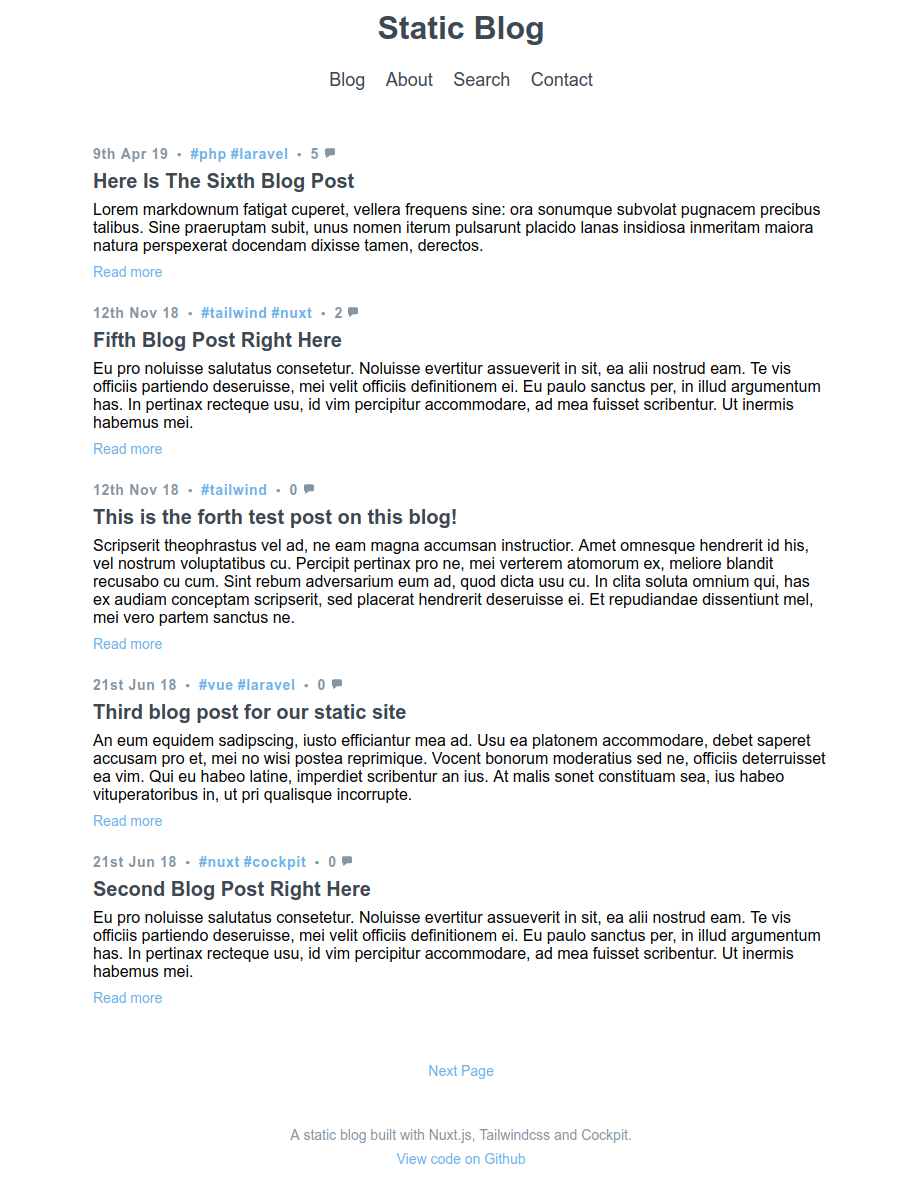
}Adding Comment Count to Posts
To add a little comment count to the top of each post you can edit a small part of the following files - index.vue, _page.vue and _tag.vue to the following:
<div class="text-gray-600 font-bold text-sm tracking-wide">
  {{ post._created | toDate }}
  <span class="ml-1 text-xs">•</span>
  <a v-for="tag in post.tags" :key="tag" :href="'/category/'+tag" class="ml-1">#{{ tag }}</a>
  <span class="mx-1 text-xs">•</span>
  <span>
    {{ post.comments ? post.comments.length : 0 }}
    <svg xmlns="http://www.w3.org/2000/svg" viewBox="-2 -2 24 24" width="12" height="12" preserveAspectRatio="xMinYMin" class="inline-block text-gray-600 fill-current">
      <path d="M3 .565h14a3 3 0 0 1 3 3v8a3 3 0 0 1-3 3h-6.958l-6.444 4.808A1 1 0 0 1 2 18.57v-4.006a2 2 0 0 1-2-2v-9a3 3 0 0 1 3-3z"></path>
    </svg>
  </span>
</div>
and then in _title_slug.vue to this so we can click the comment count and be taken straight to the comment section:
<div class="text-gray-600 font-bold text-sm tracking-wide">
  {{ post._created | toDate }}
  <span class="ml-1 text-xs">•</span>
  <a v-for="tag in post.tags" :key="tag" :href="'/category/'+tag" class="ml-1">#{{ tag }}</a>
  <span class="mx-1 text-xs">•</span>
  <a href="#comments" class="text-gray-600">
    {{ post.comments ? post.comments.length : 0 }}
    <svg xmlns="http://www.w3.org/2000/svg" viewBox="-2 -2 24 24" width="12" height="12" preserveAspectRatio="xMinYMin" class="inline-block text-gray-600 fill-current">
      <path d="M3 .565h14a3 3 0 0 1 3 3v8a3 3 0 0 1-3 3h-6.958l-6.444 4.808A1 1 0 0 1 2 18.57v-4.006a2 2 0 0 1-2-2v-9a3 3 0 0 1 3-3z"></path>
    </svg>
  </a>
</div>
It should now look a little like this.
Closing Thoughts
This is only a basic example of a comment system and it could definitely be greatly improved but hopefully it gives you some ideas on what you can do with Cockpit.
Now whenever a new comment is approved Cockpit will automatically fire our rebuild webhook from part 3 of this series and run npm run generate again for our site!
If you notice any problems or can think of any improvements for this post feel free to add a comment or open an issue on Github.
You can check out the GitHub repo of the finished blog here.
Also I've just launched a live demo of this site on Netlify - https://nuxt-cockpit-static-blog.netlify.com