In this post of our Nuxt Cockpit Static Blog series we'll be looking at how to add a basic contact form to our static site so we can receive enquiries from users. The form will have both client and server side validation. We'll also take a look at some basic spam protection measures we can add.
If you haven't read Parts 1, 2, 3, 4 and 5 of this guide you can find them here:
- Part 1: Setup
- Part 2: Dynamic Routes
- Part 3: Deployment
- Part 4: Post Pagination
- Part 5: Searching Posts
Handling Forms on Static Sites
There are a number of different ways you can go about handling forms on static sites, including:
- Netlify
- Google Forms
- Formspree
- 99 Inbound
Cockpit comes with its own solution that can help us add forms to our site using simple API POST requests to handle submissions.
Submissions made through the API can be viewed in the Cockpit dashboard and also notify you via email when a new submission is made.
You can read more about Cockpit forms in the documentation here.
Adding a New API Token
First things first we need to generate a new API token in Cockpit and also make sure it only has permissions to hit the forms endpoint.
So head over to Cockpit and go to Settings then API Access. Click the little plus icon to add a new key and add the following to the rules field: /api/forms/submit/*.
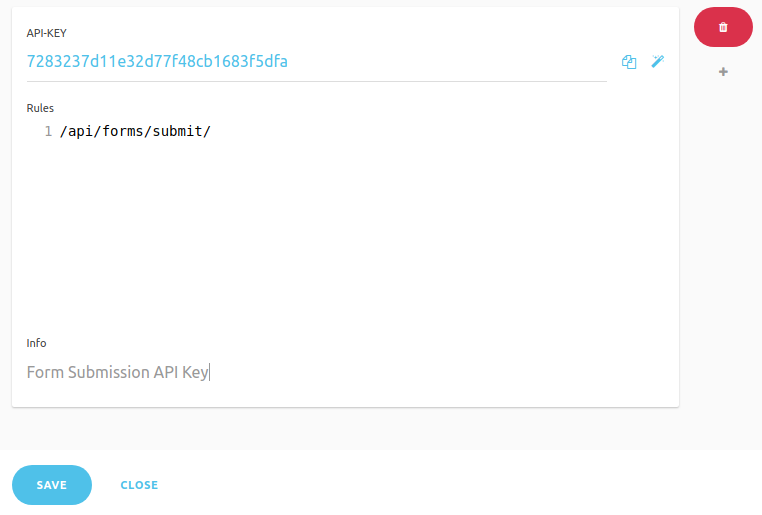
Now this key will only be able to perform form submissions.
Creating a New Form in Cockpit
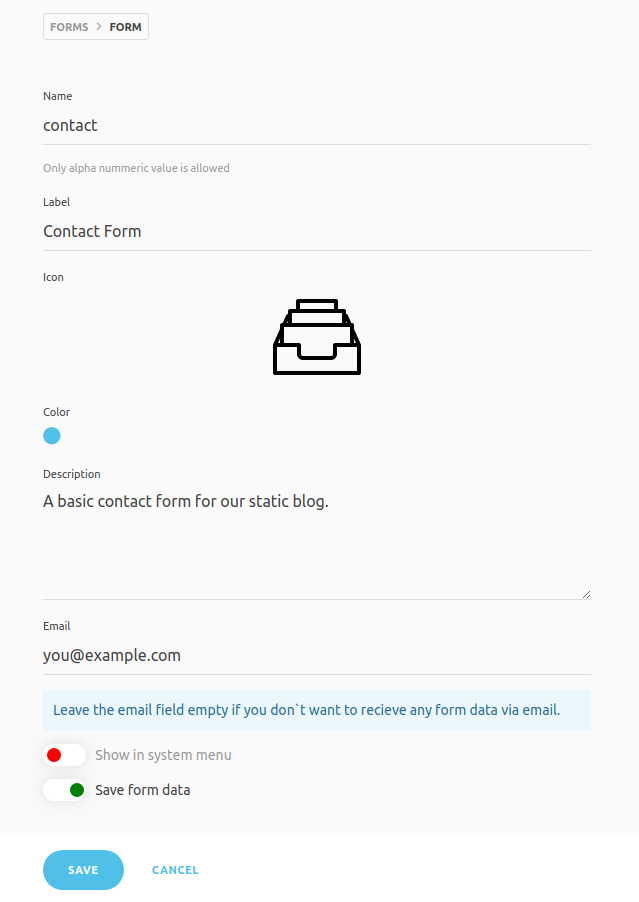
In order for Cockpit to handle submissions we first need to create a new form. So from the dashboard click on forms and then click 'Create one'.
Give it a name like contact and a label of Contact Form. Add your email if you wish to be notified when new submissions are made. Turn on 'Save form data' if you would like to be able to view submission entries from Cockpit.
Now that we've created our contact form in Cockpit we can test it by sending a POST request to the right endpoint.
Updating Cockpit Mailer Config
Before we can test out our form we need to update our Mailer config and add some SMTP details. Go to settings and then click on settings and add SMTP details for the email address you'd like to use.
If you didn't enter an email when creating the form above you can skip adding SMTP details
Add the following inside config.yaml
# use smtp to send emails
mailer:
    from      : you@example.com
    transport : smtp
    host      : smtp.myhost.tld
    user      : you@example.com
    password  : yourpassword
    port      : 587
    auth      : true
    encryption: tls # '', 'ssl' or 'tls'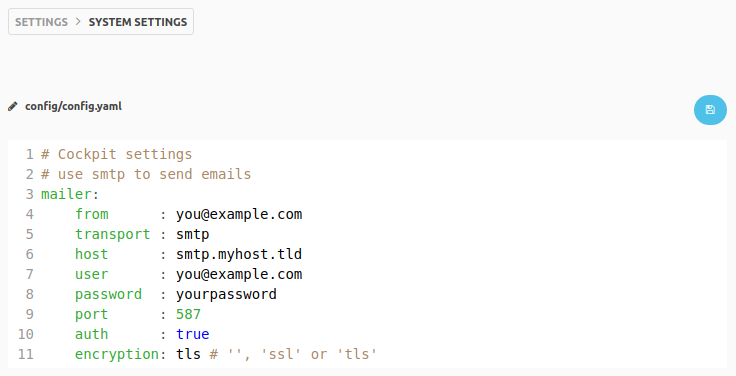
Testing Our Contact Form
If you have Postman or Insomnia installed you can easily send a POST request to your Cockpit endpoint.
The endpoint we need to use is cms.yourdomain.com/api/forms/submit/contact?token=xxx where token is the API Key we created above to use for our form.
Make sure to set a header with Content-Type as application/json and then set the request body as the following JSON:
{
    "form": {
        "name":"John Doe",
        "email":"johndoe@example.com",
        "message": "This is the message body!"
    }
}
The response returned if all was successful should just be the new form entry:
{
  "name": "John Doe",
  "email": "johndoe@example.com",
  "message": "This is the message body!"
}
If an error occurred (e.g. forgetting to update config.yaml) then the response will look something like this:
{
  "error": "Invalid address:  (From): root@localhost",
  "data": {
    "name": "John Doe",
    "email": "johndoe@example.com",
    "message": "This is the message body!"
  }
}
If you head to cms.yourdomain.com/forms/entries/contact you should now see the entry we just submitted via the API. You should also have received an email with the form submission details.
Updating Our Blogs Environment Variables
Open up your .env file for Nuxt and add a new variable called FORMS_TOKEN.
FORMS_TOKEN=xxxxxxxxxxxxxxNow we also need to update the env property in our nuxt.config.js. Add the following anywhere inside module.exports = { ... }
env: {
  contactUrl: `${process.env.BASE_URL}/api/forms/submit/contact?token=${process.env.FORMS_TOKEN}`
},
As mentioned in the previous post the reason we need to do this is because we will be making requests to contactUrl on the client side which means we need to have this variable bundled up in our js files.
Make sure you also update your create-env.js if deploying to Netlify. Also update your environment variables in Netlify.
const fs = require('fs')
fs.writeFileSync('./.env', `
BASE_URL=${process.env.BASE_URL}\n
POSTS_URL=${process.env.POSTS_URL}\n
URL=${process.env.URL}\n
PER_PAGE=${process.env.PER_PAGE}\n
SEARCH_URL=${process.env.SEARCH_URL}\n
FORMS_TOKEN=${process.env.FORMS_TOKEN}
`)
Adding the Contact Page
Now that we know our contact form is working as expected we can go and set it up in our blog.
First we'll just update our PageNav.vue component to add a link to the new page:
<template>
  <nav class="text-center my-4">
    <a href="/" class="p-2 text-sm sm:text-lg inline-block text-gray-800 hover:underline">Blog</a>
    <a href="/about" class="p-2 text-sm sm:text-lg p-2 inline-block text-gray-800 hover:underline">About</a>
    <a href="/search" class="p-2 text-sm sm:text-lg p-2 inline-block text-gray-800 hover:underline">Search</a>
    <a href="/contact" class="p-2 text-sm sm:text-lg p-2 inline-block text-gray-800 hover:underline">Contact</a>
  </nav>
</template>
Then create a new file in the pages directory called contact.vue and put the following inside.
<template>
  <section class="my-8">
    <div class="text-center">
      <h1 class="mb-6">Contact Page</h1>
      <p class="mb-8">
        This is a basic contact form working with Cockpit CMS!
      </p>
    </div>

    <form @submit="checkForm" method="post">
      <div class="mb-4">
        <label for="name">Name:</label>
        <input v-model="name" type="text" name="name" placeholder="Your Name" class="block mt-2 bg-gray-200 rounded w-full py-2 px-3">
      </div>
      <div class="mb-4">
        <label for="mail">Email:</label>
        <input v-model="email" type="email" name="email" placeholder="Your Email" class="block mt-2 bg-gray-200 rounded w-full py-2 px-3">
      </div>
      <div class="mb-4">
        <label for="msg">Message:</label>
        <textarea v-model="message" name="message" placeholder="Your Message" class="block mt-2 bg-gray-200 rounded w-full py-2 px-3"></textarea>
      </div>
      <div class="mb-4">
        <input type="submit" value="Send message" :class="{ 'cursor-not-allowed opacity-50': loading }" class="cursor-pointer bg-blue-500 hover:bg-blue-400 text-white font-bold py-2 px-4 border-b-4 border-blue-600 hover:border-blue-500 rounded">
      </div>
      <div v-if="errors.length" class="mb-4 text-red-500">
        <b>Please correct the following error(s):</b>
        <ul>
          <li v-for="error in errors" :key="error">
            {{ error }}
          </li>
        </ul>
      </div>
      <div v-if="success" class="text-green-500">
        <b>Your message has been sent succesfully</b>
      </div>
    </form>
  </section>
</template>
<script>
import axios from 'axios'
export default {
head () {
return {
title: 'Contact',
meta: [
{ hid: 'description', name: 'description', content: 'This is the contact page!' }
]
}
},
data: function () {
return {
errors: [],
name: null,
email: null,
message: null,
loading: false,
success: false
}
},
methods: {
checkForm: function (e) {
this.errors = []
this.success = false
if (!this.name) {
this.errors.push("Name required")
}
if (!this.email) {
this.errors.push('Email required')
} else if (!this.validEmail(this.email)) {
this.errors.push('Valid email required')
}
if (!this.message) {
this.errors.push("Message required")
}
if (!this.errors.length) {
this.submitForm()
}
e.preventDefault()
},
submitForm: function () {
this.loading = true
axios.post(process.env.contactUrl,
JSON.stringify({
form: {
name: this.name,
email: this.email,
message: this.message
}
}),
{
headers: { 'Content-Type': 'application/json' }
})
.then(({ data }) => {
this.loading = false
if(data.error){
this.errors.push(data.error)
} else if(data.name && data.email && data.message) {
this.name = this.email = this.message = null
this.success = true
}
}).catch(error => {
this.loading = false
this.errors.push('An error occured, please try again later')
})
},
validEmail: function (email) {
let re = /^(([^<>()\[\]\\.,;:\s@"]+(\.[^<>()\[\]\\.,;:\s@"]+)*)|(".+"))@((\[[0-9]{1,3}\.[0-9]{1,3}\.[0-9]{1,3}\.[0-9]{1,3}\])|(([a-zA-Z\-0-9]+\.)+[a-zA-Z]{2,}))$/
return re.test(email)
}
}
}
</script>As you can see we have some basic fields for our form and on submitting the form we perform some client side validation following the example in the Vue documentation here.
If there are no client side validation errors then we call the submitForm method and use axios to make a POST request to our contactUrl endpoint. Then we simply display some text with a success message or an error if there is one present.
If no error is present we check if an entry has been returned with name, email and message details (this is what happens when a form is succesfully submitted).
You can fire up your local site using npm run dev and test this contact form out. You should receive an email notification and be able to see the entry in Cockpit.
Adding Server Side Validation
At the moment we only have validation for our form fields on the client side which can be circumvented, we need to also add validation for our fields in Cockpit.
We can add custom validation for our form fields in Cockpit by creating a new file with the same name as our form (in our case contact) in the config/forms directory. You will need to create the forms directory first.
Then make a new file called contact.php and put the following inside:
<?php

if (empty($data['name'])) {
    $this->app->stop(['error' => 'The name field is required'], 200);
}

if (!filter_var($data['email'], FILTER_VALIDATE_EMAIL)) {
    $this->app->stop(['error' => 'A valid email is required'], 200);
}

if (empty($data['message'])) {
    $this->app->stop(['error' => 'The message field is required'], 200);
}

return true;
The form data is available in the $data variable. This is only really simple validation for an example.
I initially had return false; inside each of the above valiation checks however it didn't give any information to the client about why the validation had failed. Instead we're stopping Cockpit and returning an error message with more details. You can return a 412 status code or something else if you like and handle these responses in axios catch() if you'd prefer.
To test out if this validation is working on the server we need to send a POST request using Postman/Insomnia with name set to null.
If you don't have Postman or Insomnia just comment out the following in contact.vue to temporarily disable to client side validation then submit the form on the front end without setting a value for the name field:
checkForm: function (e) {
  this.errors = []
  this.success = false

  /* if (!this.name) {
    this.errors.push("Name required")
  }
  if (!this.email) {
    this.errors.push('Email required')
  } else if (!this.validEmail(this.email)) {
    this.errors.push('Valid email required')
  }
  if (!this.message) {
    this.errors.push("Message required")
  } */

  if (!this.errors.length) {
    this.submitForm()
  }

  e.preventDefault()
},
Now if you've added the contact.php file correctly you should notice that the response is returned with an error message if validation fails on the server. You shouldn't receive a notification email and there should not be a new entry visible in Cockpit.
Spam Prevention
If you have any kind of contact form on your site it is very likely you will have received spam from automated bots.
To help prevent this you can add a Google reCAPTCHA to your site/form.
If you'd rather not use reCAPTCHA another simple method is available known as a Honeypot trap.
The idea is that you add a hidden text field or checkbox to your form that the user cannot see. A bot that is filling out the form will also accidently fill out this hidden field, in our server side validation we can check if this hidden field has been filled our (or checkbox ticked) and if it has we simply return false from our contact.php script.
Let's add a really simple honeypot field to our form. Above the input button add this new field:
<input type="text" name="website" v-model="website" class="hidden opacity-0 z-0" tabindex="-1" autocomplete="off">We've given it a real looking name and set it to display: none, with 0 opacity and a z-index of 0. We've also set tabindex as -1 to prevent the user selecting the field by clicking tab and set autocomplete as off to prevent a user's browser accidently autocompleting and filling in the field.
Make sure to add website to the page's data:
data: function () {
  return {
    errors: [],
    name: null,
    email: null,
    message: null,
    website: null,
    loading: false,
    success: null
  }
},
Also add it when posting the request to Cockpit:
submitForm: function () {
  this.loading = true

  axios.post(process.env.contactUrl,
  JSON.stringify({
      form: {
        name: this.name,
        email: this.email,
        message: this.message,
        website: this.website
      }
    }),
  {
    headers: { 'Content-Type': 'application/json' }
  })
  .then(({ data }) => {
    this.loading = false

    if(data.error){
      this.errors.push(data.error)
    } else if(data.name && data.email && data.message) {
      this.name = this.email = this.message = null
      this.success = true
    }
  }).catch(error => {
    this.loading = false

    this.errors.push('An error occured, please try again later')
  })
},
Now all that's left to do is to update contact.php in the config/forms directory.
<?php

if (isset($data['website'])) {
    return false;
}

if (empty($data['name'])) {
    $this->app->stop(['error' => 'The name field is required'], 200);
}

if (!filter_var($data['email'], FILTER_VALIDATE_EMAIL)) {
    $this->app->stop(['error' => 'A valid email is required'], 200);
}

if (empty($data['message'])) {
    $this->app->stop(['error' => 'The message field is required'], 200);
}

return true;
We just add a check for the new website honeypot field, if it is not set to null then the submission will fail vailidation and be rejected. We're just returning false here instead of a validation error message but you can add one if you like.
The only potential downside to this method of spam prevention is if a real user someone manages to accidently fill in the website field and their legitimate submission is rejected.
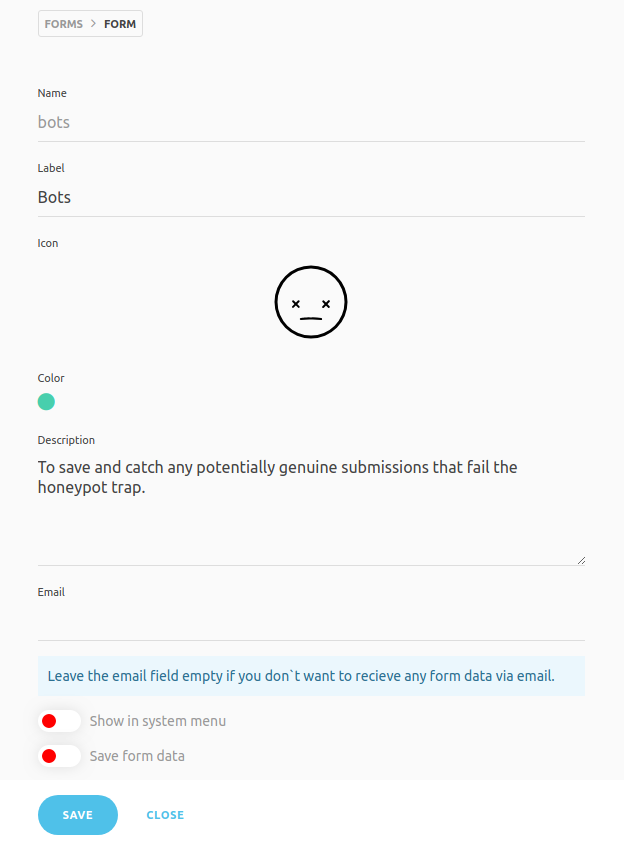
To make sure we don't lose a genuine submission we should add logging or save all entries that fail the honeypot field test. That way we can check every so often which submissions have been rejected and see if any are authentic.
One way we could do this is by creating a new form called bots without setting an email and without setting save form data as true.
Then we can just update our custom validation for contact at config/forms/contact.php and add the following:
<?php

if (isset($data['website'])) {

    // save the submission in case it is actually a genuine one
    cockpit('forms')->save('bots', ['data' => $data]);

    return false;
}

if (empty($data['name'])) {
    $this->app->stop(['error' => 'The name field is required'], 200);
}

if (!filter_var($data['email'], FILTER_VALIDATE_EMAIL)) {
    $this->app->stop(['error' => 'A valid email is required'], 200);
}

if (empty($data['message'])) {
    $this->app->stop(['error' => 'The message field is required'], 200);
}

return true;
Now if you send a POST request to your contact form and make sure to set website as some value then you should see the submission is saved in your bots form entries at cms.yourdomain.com/forms/entries/bots.
This obviously doesn't prevent against a bot sending direct POST requests to our form's endpoint and omitting the website field but it should be fine for most situations.
If you want to make sure that ONLY the fields you want can be posted to your form then you can add something like this to your validation:
foreach($data as $field => $value){
    if(!in_array($field, ['website', 'name', 'email', 'message'])){
        return false;
    }
}
Now if any additional field is added or sent the validation will fail.
You can always change the name of the honeypot field or update it to a checkbox if you notice spam coming through.
You should now have a contact form with client + server side validation and basic spam bot protection that looks like this:

You can check out the GitHub repo of the finished blog here and see a live demo of the site on Netlify here - https://nuxt-cockpit-static-blog.netlify.com